Below are three pics of my sidecar body now in primer. Just need to sand and put on the top coat to match my my bike. I cut a hole in the front for the windshield vent I am going to install for more air for the passenger.
Car Stuff from the C.O.M. (Crazy Old Man)
Total Pageviews
Friday, July 17, 2015
Friday, July 10, 2015
The top photo here is a make shift sanding shed I set up outside to prepare the sidecar tub for paint. No sun and a nice breeze. Worked great.
The bottom photo is the new steering stabilizer I installed. Had to fab a bracket. Going to work just fine and it is adjustable from easy to hard. Going to help a lot with this setup.
Tuesday, June 30, 2015
Making good progress on getting sidecar mounted. Hooked up frame. Bottom mounts were pretty easy to fabricate. Went through several configurations with to top mounts before I was satisfied plus making room for body to fit frame. Test drove with frame only and had to make adjustments to toe in and lean out. Will install a steering stabilizer before next test run. Body is just siting on there for now to see how it looked. Will take it off and repaint it to match bike. Y'all have a good day now ya hear. God Bless.
Monday, June 15, 2015
Got this home safe and sound last Friday. Granddaughter was out today and has already claimed it and named it. She wants it to be called "Rock & Roll". I will probably do that before I am finished with it. Below are a few pics of it after I dismantled it. Have to adapt to my BMW K100LT. Have to paint the body to match my bike. Y'all have a good day ya hear. God Bless.
Friday, June 12, 2015
New Toy
Going to pick up this used sidecar today. A California Friendship One. Going to mount it on my BMW. Have to repaint it and fabricate new mounts to fit my bike. Wish me luck. God Bless and Ya'll have a good day. YaHear.
Saturday, November 2, 2013
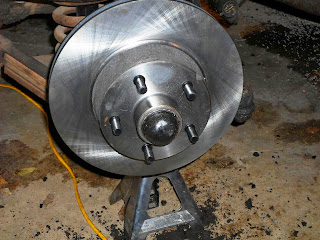
Just finished what I call phase 2 of updating some things on my old Ford. I bought a kit to convert the fro drum brakes to disc brakes. Purchased the kit from Wilwood. This is a great kit. Easy bolt on process. The calipers have four pistons each. Tons of stopping power and that is what I am looking for. Besides this kit I installed a vacuum assisted brake booster along with a master cylinder that is designed for disc brakes. A must have if you want your brake system to work properly. Plus this all dresses up the old girl pretty nicely. Thanks for taking the time to look. Yall take care now...ya hear and God Bless
Thursday, October 31, 2013
I have decided as a winter project to update some things on my old Ford. I am at present replaceing the entire rear end from stock to a 1964 Mustang rear end. The original rear end had 3:30 to 1 ration. My RPMS are running a little high to my liking. The Mustang rear end has 2.73 to 1 ratio. This will give me a better running gear going down the road. I plan to take some road trips in it next summer. It is a good road gear.
A good practice when replacing a complete rear end for one that has been sitting around out of a car and lying where the elements can get to it is to replace the gear lube, replace the brake shoes and also replace the wheel cylinders. Wheel cylinders are only about ten bucks each and well worth the peace of mind. One of the drums was cracked so I purchased two new ones. Braking is very important to me. The only alteration I had to make to the rear end was to cut of the spring pearchs and weld on new ones. The stang rear end was only one half inch wider than the original which only computes to one quarter inch per side. And yes I made sure my beefy radials would fit before I went to all this trouble. The pic is of the old rear end and components used to make the change. My tranny is out of a 78 T Bird. Automatic C6 therefore I had to alter the drive shaft. Front of drive shaft is now for the T bird tranny and the rear is for a 68 Mustang....reminds me of the old Johnny Cash song. Does anyone know which on that is???
A good practice when replacing a complete rear end for one that has been sitting around out of a car and lying where the elements can get to it is to replace the gear lube, replace the brake shoes and also replace the wheel cylinders. Wheel cylinders are only about ten bucks each and well worth the peace of mind. One of the drums was cracked so I purchased two new ones. Braking is very important to me. The only alteration I had to make to the rear end was to cut of the spring pearchs and weld on new ones. The stang rear end was only one half inch wider than the original which only computes to one quarter inch per side. And yes I made sure my beefy radials would fit before I went to all this trouble. The pic is of the old rear end and components used to make the change. My tranny is out of a 78 T Bird. Automatic C6 therefore I had to alter the drive shaft. Front of drive shaft is now for the T bird tranny and the rear is for a 68 Mustang....reminds me of the old Johnny Cash song. Does anyone know which on that is???
Subscribe to:
Comments (Atom)


